Meteor Pro - User manual (EN)
Quick start and user manual for the NomadStar Meteor Pro
- General context
- Package content
- Device layout
- Installation and transport
- Operation - Meshtastic
- Firmware update - Meshtastic
- Datasheet
- Maintenance and service
- Manufacturer & compliance information
- End of life and recycling
General context

The Meteor Pro is a portable communication device designed for professional field operations.
It is based on LoRa (Long Range) wireless technology, enabling long-distance communication while maintaining low power consumption — an ideal solution for large-scale or remote-area operations.
The device features a modular RP-SMA antenna, a high-capacity rechargeable Li-ion battery, and a rugged IP66-rated enclosure, offering strong protection against dust and water.
Its robust design makes it suitable for civil protection, search and rescue (SAR), outdoor expeditions, and tactical operations.
Fully compatible with Meshtastic®, an open-source off-grid mesh communication network, and ATAK (Android Team Awareness Kit), the Meteor Pro integrates seamlessly into modern communication ecosystems for professional and mission-critical scenarios.
Statement: If the device is not used in accordance with the manufacturer's specifications and intended use, risks may arise.
Statement: Before using this device, carefully read this user manual in its entirety. Understanding the information provided is essential for safe and effective operation. Failure to follow the instructions and safety precautions may result in injury, damage to the device, or voiding of the warranty. Keep this manual handy at all times for reference during use and maintenance.
Package content
The Meteor Pro packaging contains:
- A Meteor Pro LoRa mesh radio
- A stainless steel 304 belt clip
- A LoRa antenna for your region (868Mhz or 915Mhz)
- A 1m USB-C<->USB-C charging and data cable
- Accessories (reset key, clip installation key, goodies)
Product name: Meteor Pro
Release year: 2026
Country of origin: Switzerland
Device layout
General layout
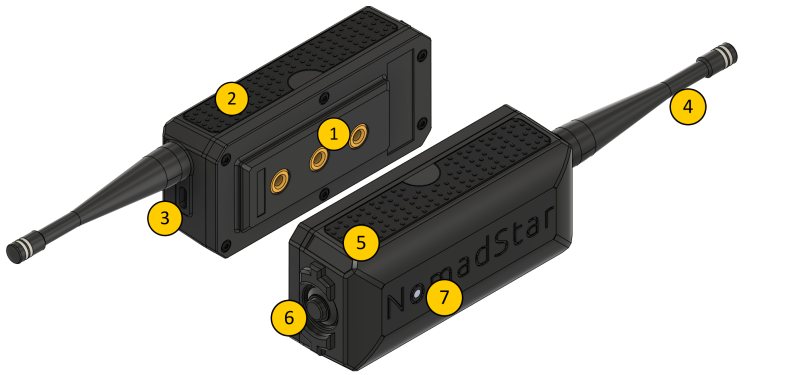
- TM5 modular attachments system
- Silicon grip
- USB-C connector
- Antenna
- Stainless steel ID plate
- Power / Shutdown button
- RGB status LED
Component details
TM5 Modular Attachment System
A modular mounting system featuring three M5 threaded inserts.
It allows you to securely attach compatible accessories or custom mounts to the Meteor Pro.
Designed for strength and versatility in professional field use.
M5 screw max length 5mm, 6mm with a washer
Silicone Grip
Durable silicone side grip ensures a secure and comfortable hold, even in wet or cold environments.
RP-SMA Antenna Connector
Standard RP-SMA connector enabling quick antenna swaps when traveling between different LoRa frequency regions.
Use only provided antennas corresponding to your regional frequency band.
USB-C Connector
The USB-C port is used for:
-
Charging the internal battery
-
Firmware updates
-
Serial communication (via Web Serial or USB connection)
Use a high-quality, data-capable USB-C cable for reliable operation.
RGB Status LED
| Status | Meaning |
| OFF | Device shutdown / OFF |
| ON | Device powered ON |
| Rainbow blinking | New message received |
| Steady red | Low battery |
Additionally, the LED can be customised and configured using the Meshtastic ambient lighting feature.
Stainless steel Identification Plate
Engraved identification plate for model and serial information.
Custom engraving (e.g., name, unit ID, or callsign) is available upon order.
Power / Shutdown Button
Main power control button for the Meteor Pro.
-
Short press: Power ON
-
Press and hold (≥5 seconds): Power OFF
Installation and transport
Intended use
The Meteor Pro is a portable long-range communication and geolocation device.
It is intended for professional and outdoor operations, where robust and secure communication is required.
The Meteor Pro is designed to thrive in demanding environments, such as long outdoor operation in harsh weather.
Installation and placement
-
Install the device in a location that is free from excessive vibration or direct sunlight.
-
Do not cover the enclosure or place it near heat sources such as radiators or stoves.
-
When mounted on a vehicle or structure, secure it firmly using the appropriate brackets or straps to prevent mechanical stress on the antenna or connectors.
-
Avoid bending or twisting the antenna during installation or use.
USB-C connector
-
The Meteor Pro operates from 5 V DC (USB-C).
- If the device is powered OFF, connecting it to an external power source will power it ON.
- A full charge take approximately 3.5 hours.
-
Use only certified USB-C cables and power supplies rated for at least 1 A.
-
Do not short-circuit or reverse the power polarity.
- Ensure adequate ventilation around the unit (minimum 50 mm clearance) to prevent overheating risk.
Do not use the USB-C connector while the unit is wet. If exposed to moisture, allow it to dry completely before connecting to USB-C.
Charge only between +10°C and +45°C.
Antenna assembly
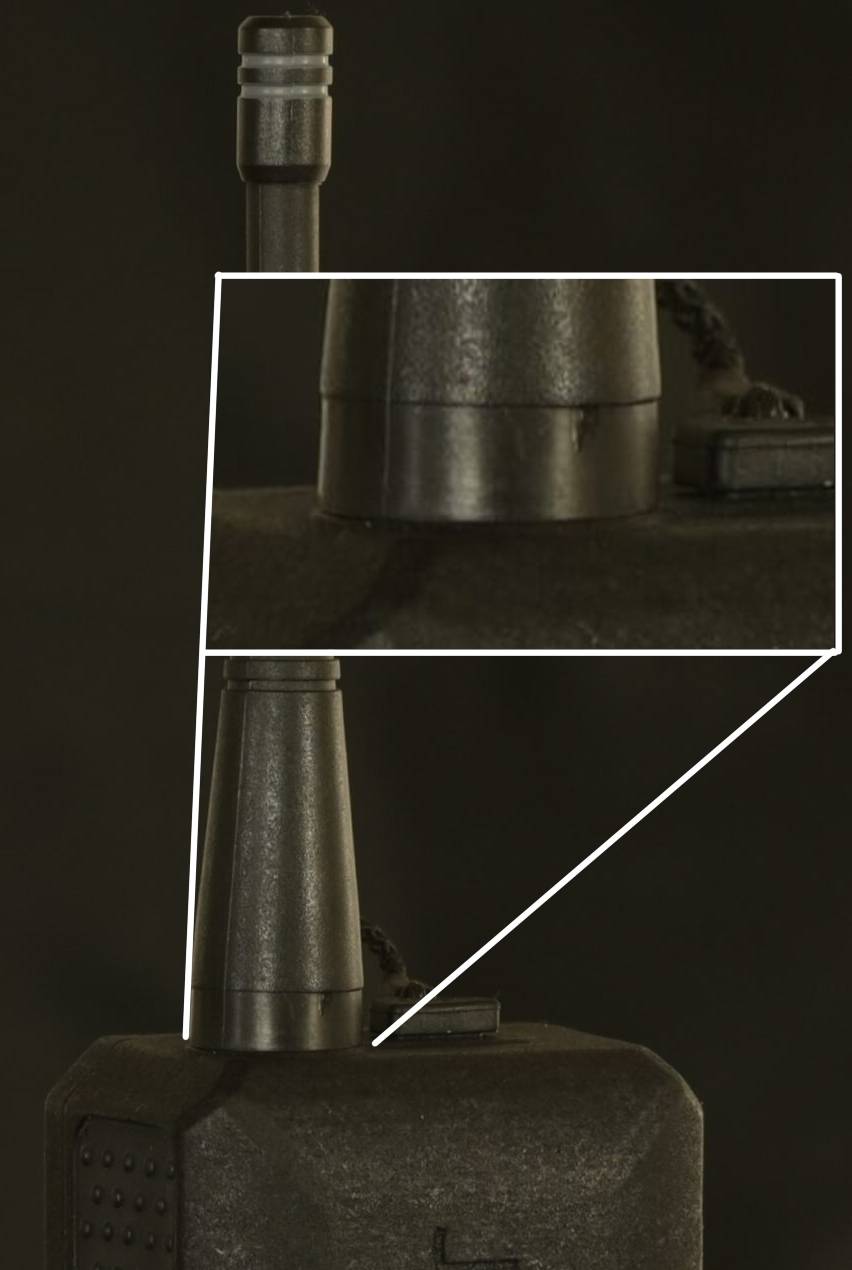
The antenna should be firmly screwed onto the RP-SMA connector but do not force. You may damage the antenna or the RP-SMA connector
Expected result:
Environmental considerations
-
Operating temperature: -20 °C to +60 °C
-
Relative humidity: 0 % to 100 % (non-condensing)
-
Suitable for indoor and outdoor use (IP66).
-
Not suitable for explosive (EEx) or flammable environments.
Improper installation or use may lead to electric shock, fire, or permanent damage to the unit.
Follow all power and mounting instructions precisely.
Transport instructions
To ensure safe transport and preserve device integrity:
-
Switch off the device before packing or transport.
-
Use the original packaging or equivalent protective foam to avoid shock and vibration damage.
-
Keep the device away from magnets, flammable materials, solvents and moisture during transport.
-
If transporting by air, comply with Li-ion battery transport regulations (IATA/ICAO).
-
Do not transport a device that shows signs of battery swelling, leaks or mechanical damage.
Shipping instructions
To ensure safe shipping and preserve device integrity:
-
Switch off the device before packing.
-
Use the original packaging or equivalent protective foam to avoid shock and vibration damage.
-
Keep the device away from magnets, flammable materials, solvents and moisture during shipping.
-
If shipping by air, comply with Li-ion battery shipping regulations (IATA/ICAO).
-
Do not ship a device that shows signs of battery swelling, leaks or mechanical damage.
Do not ship the device with a connected antenna — remove it to prevent mechanical stress on the RP-SMA connector.
Operation - Meshtastic
Meshtastic is an open source, off-grid, decentralized mesh network. No cell towers, no internet, no subscription and no infrastructure required. Just pure peer-to-peer connectivity.
Meshtastic APPs
There is many ways available to interact with your Meteor Pro. Meshtastic publishes Android and iOS apps, as well as a web client, an ATAK integration and more. You can find more details about available apps here: meshtastic.org/docs/software/
One form of a Meshtastic APP is required for the initial setup of your Meteor Pro described in the following chapter "First boot and initial setup". The following chapter takes the Meshtastic Android app as an example but those settings can easily be applied to all flavour of the Meshtastic app.
First boot and initial setup
The following process is required when you boot your Meteor Pro for the first time. This process takes 5 minutes and will guide you throw some essentials required for you and your Meteor to be able to communicate with others.
A reboot of the Meteor is required to change certain settings. Don't worry if the Meteor reboots after changing settings and clicking on "Save".
-
Attach the supplied antenna securely to the RF connector. Using only 2 fingers screw on the provided antenna on the RP-SMA antenna connector (3). Stop screwing once the antenna is flush with the enclosure.
-
Press briefly and immediately release the Power button, wait 5 seconds. The indicator LED lights up and the Meteor is now "ON".
-
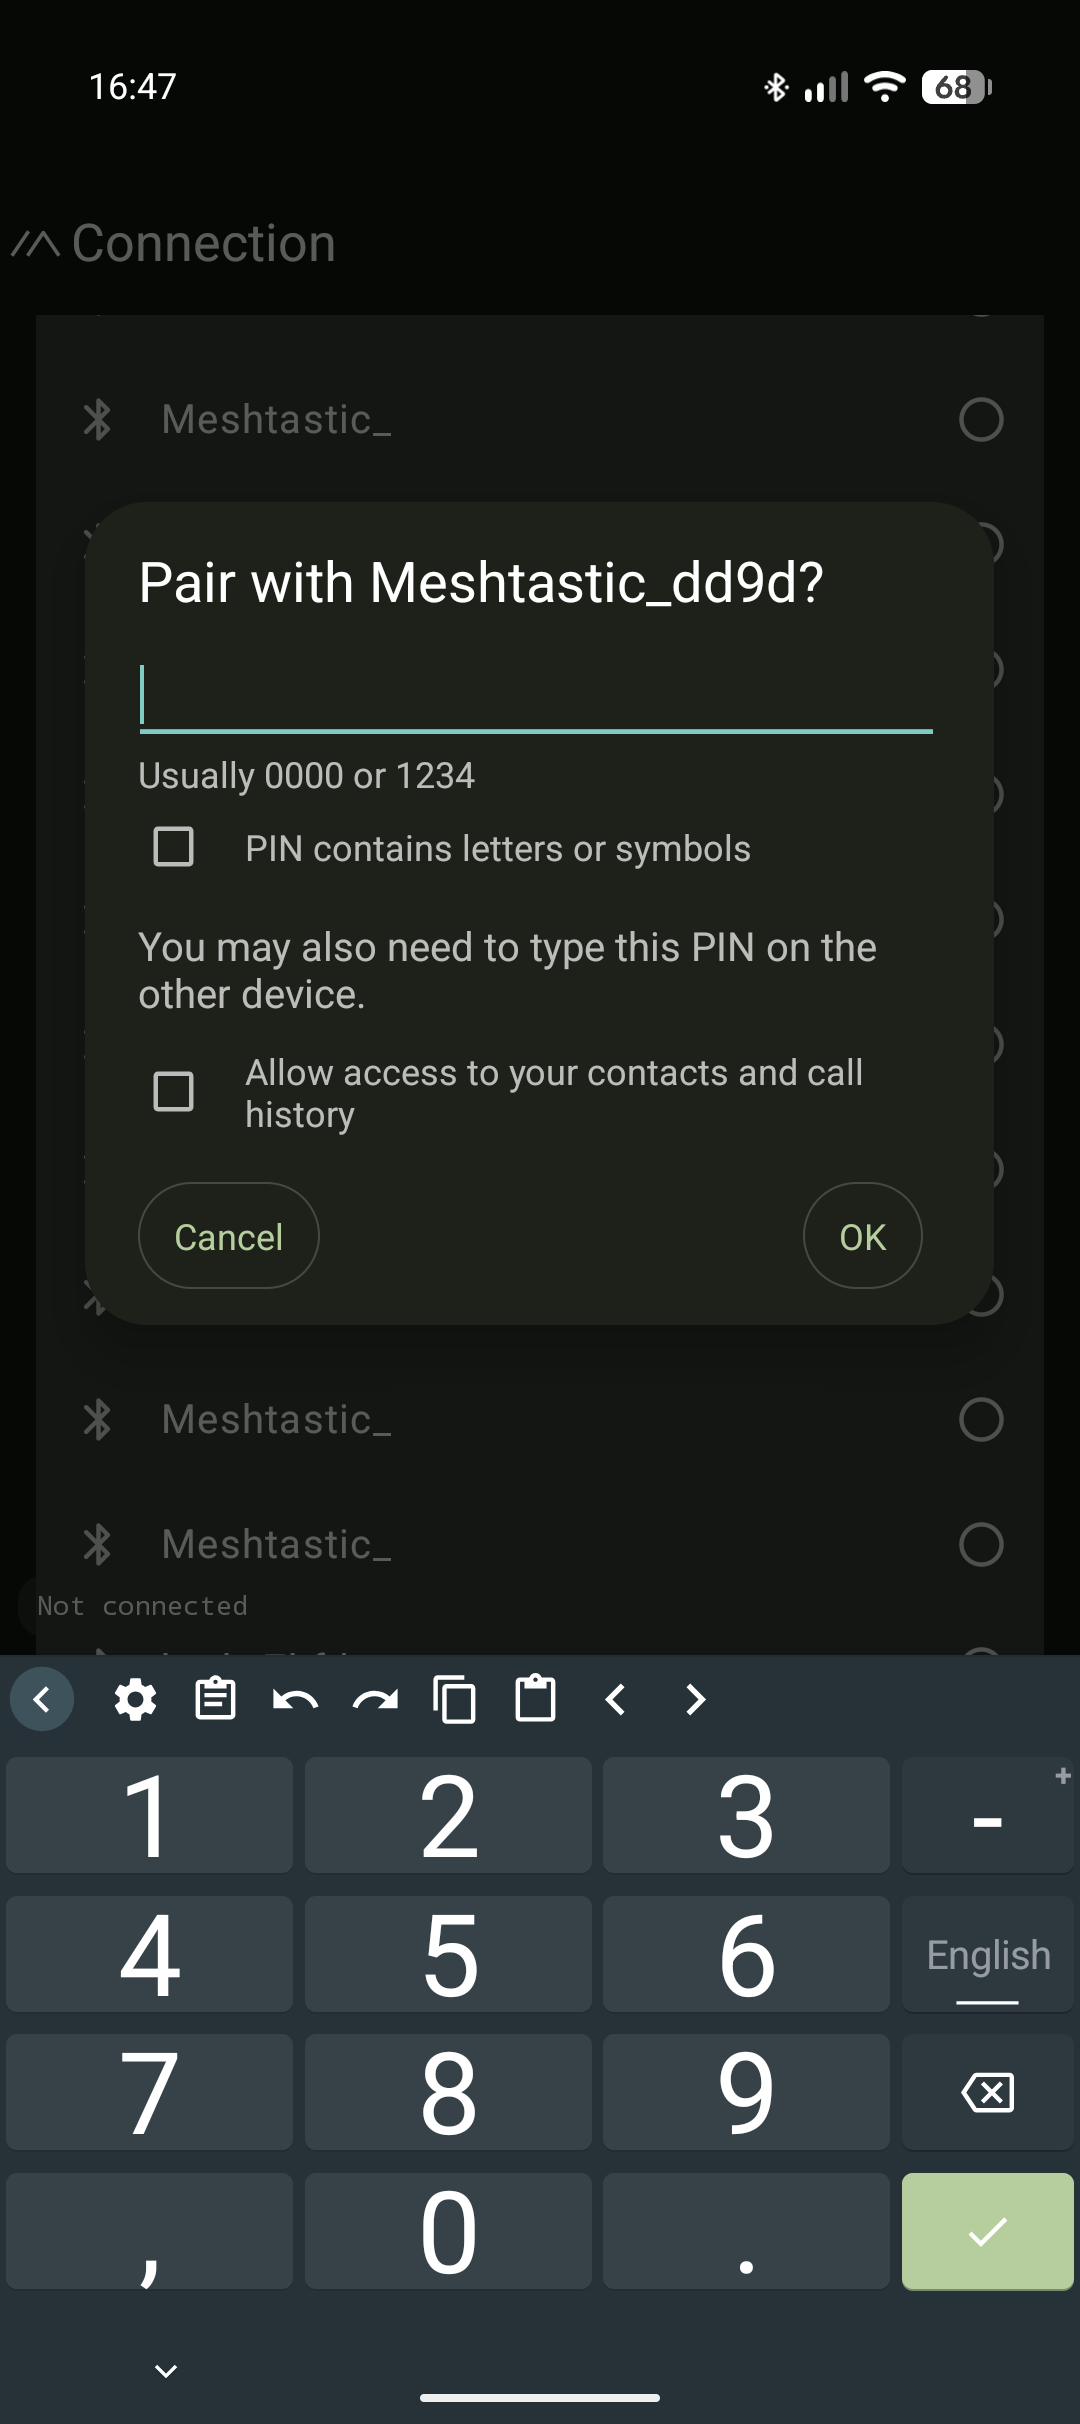
Connect to the device via Bluetooth 5.0 using the supported Meshtastic app.
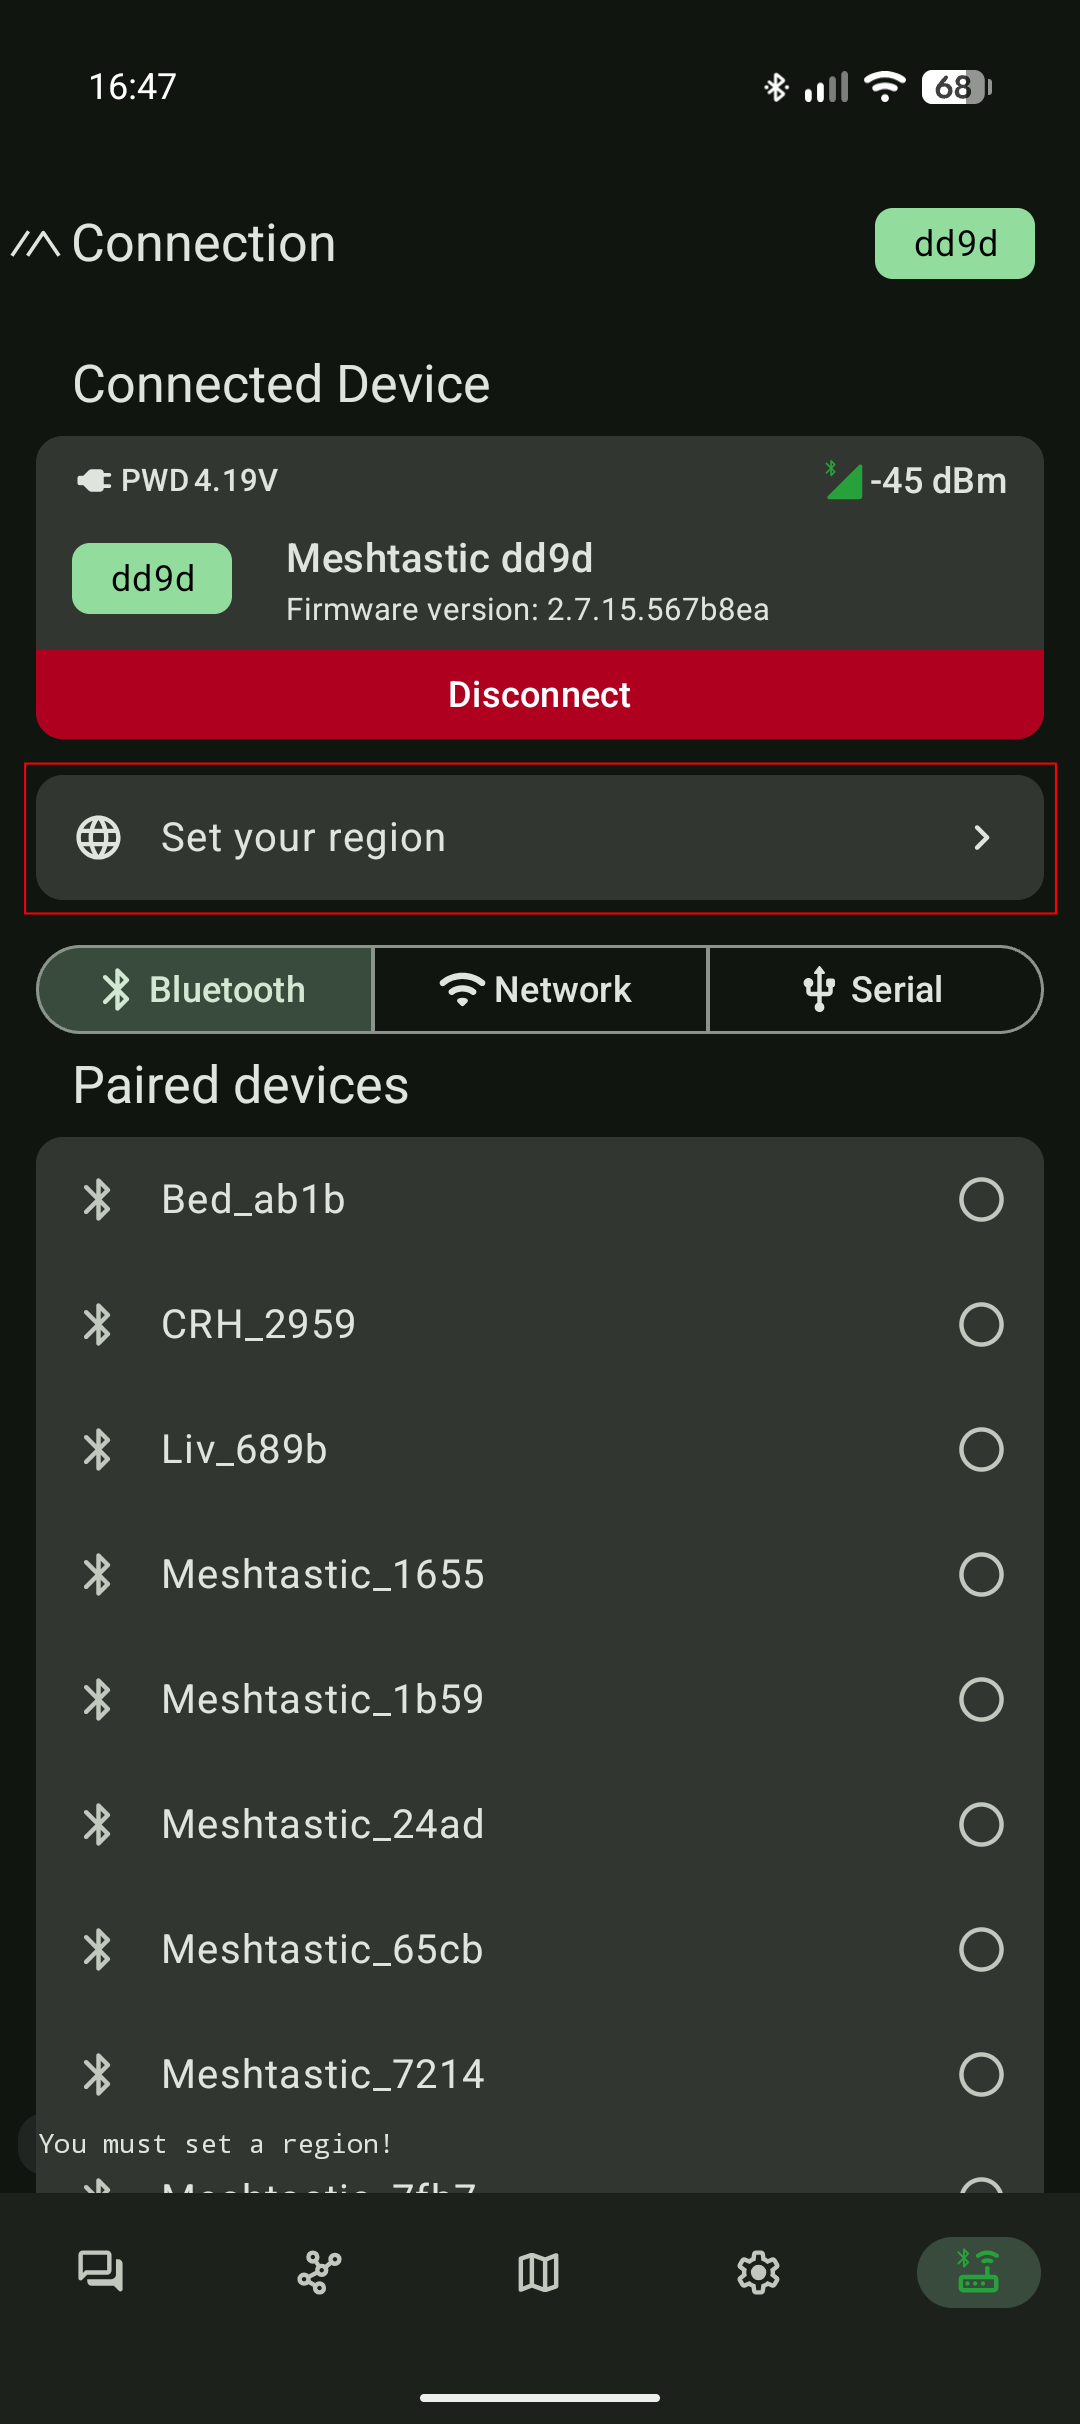
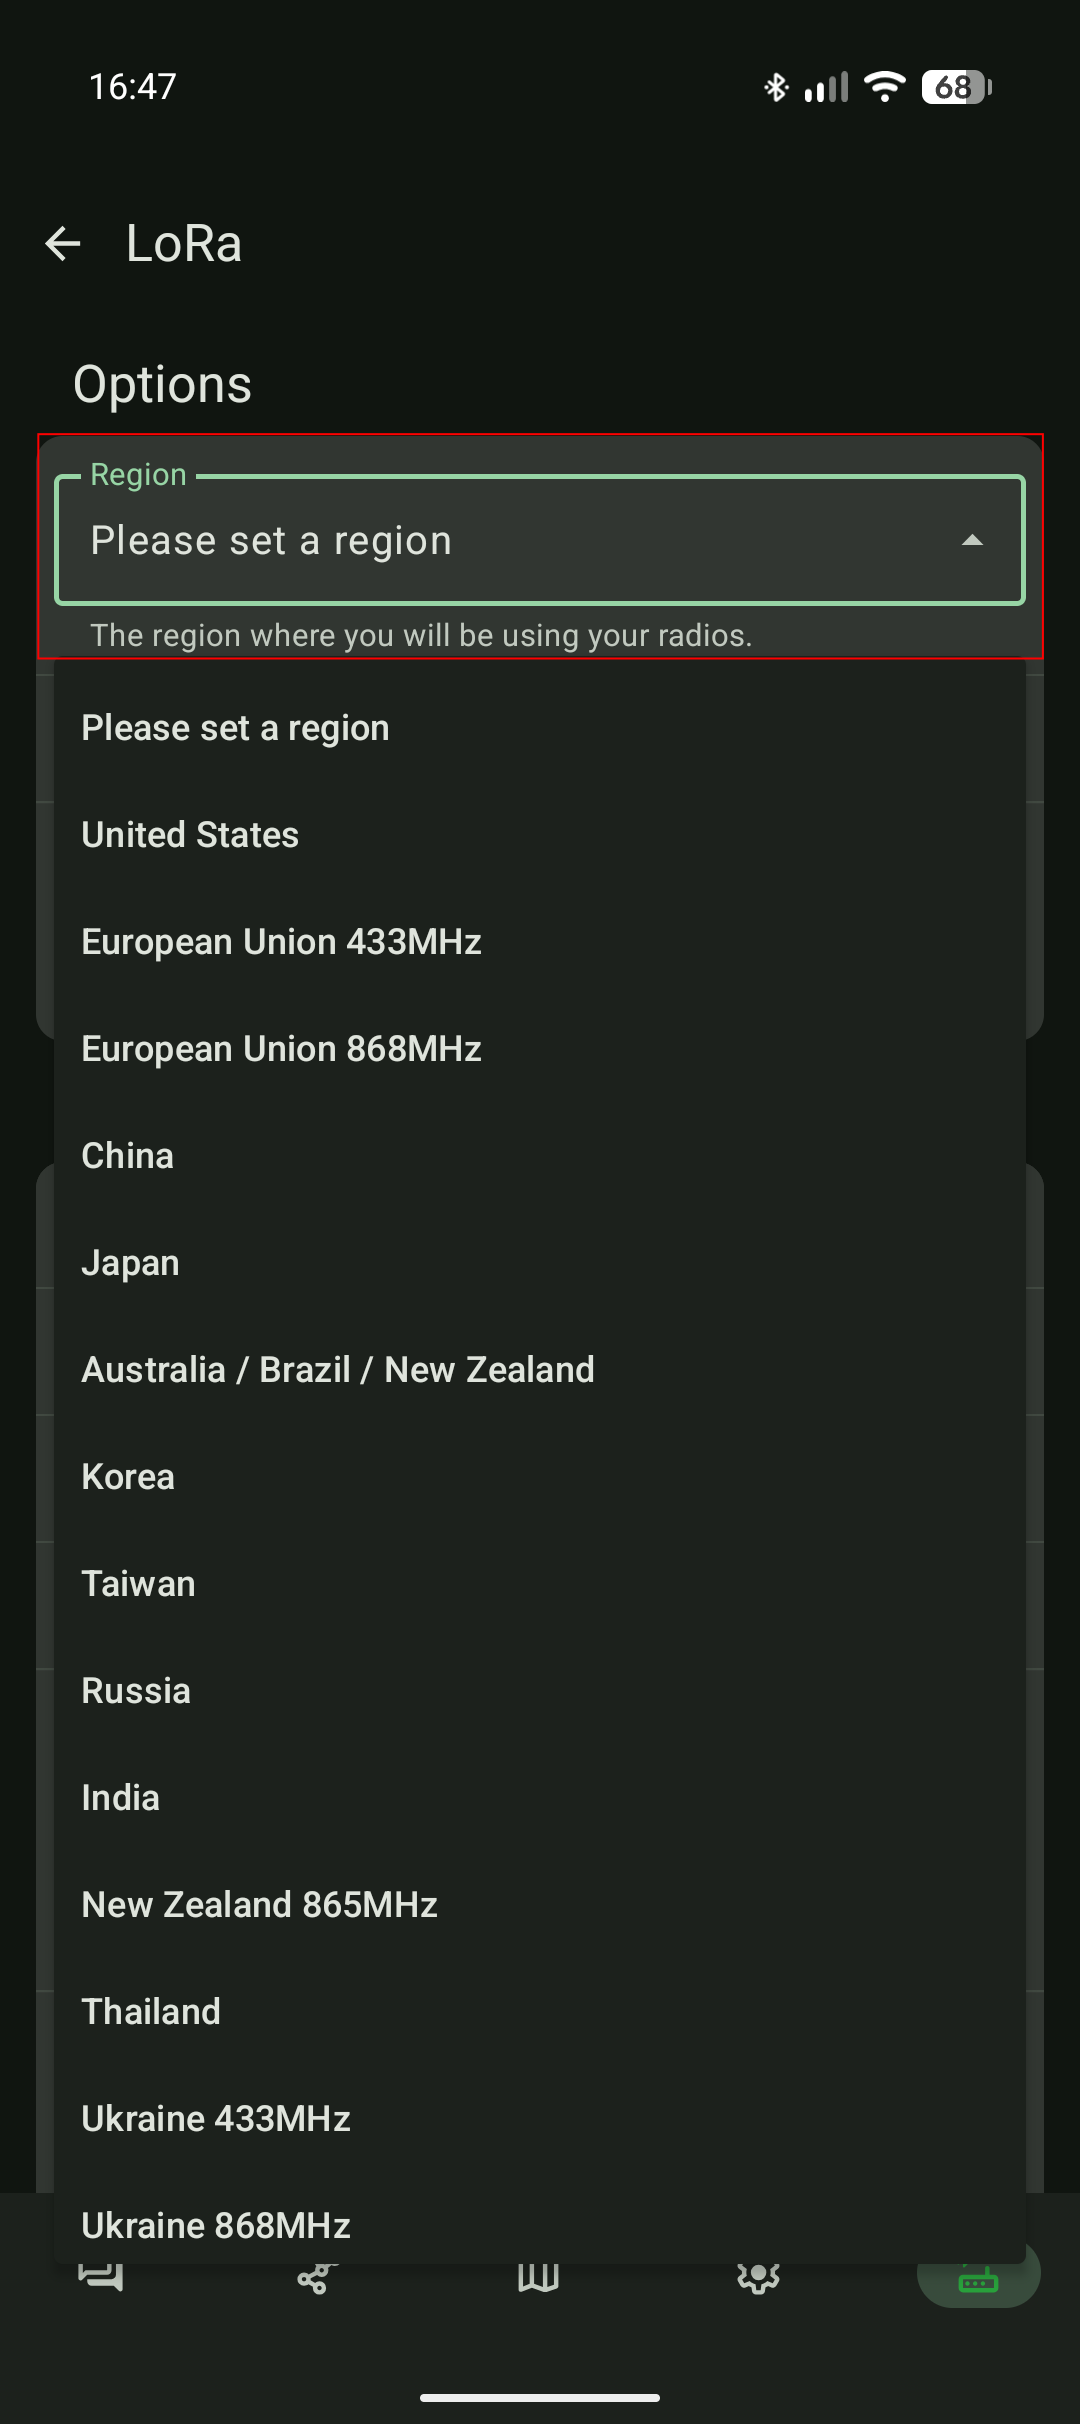
- Click on "Set your region"
- Select the region matching your approximate location
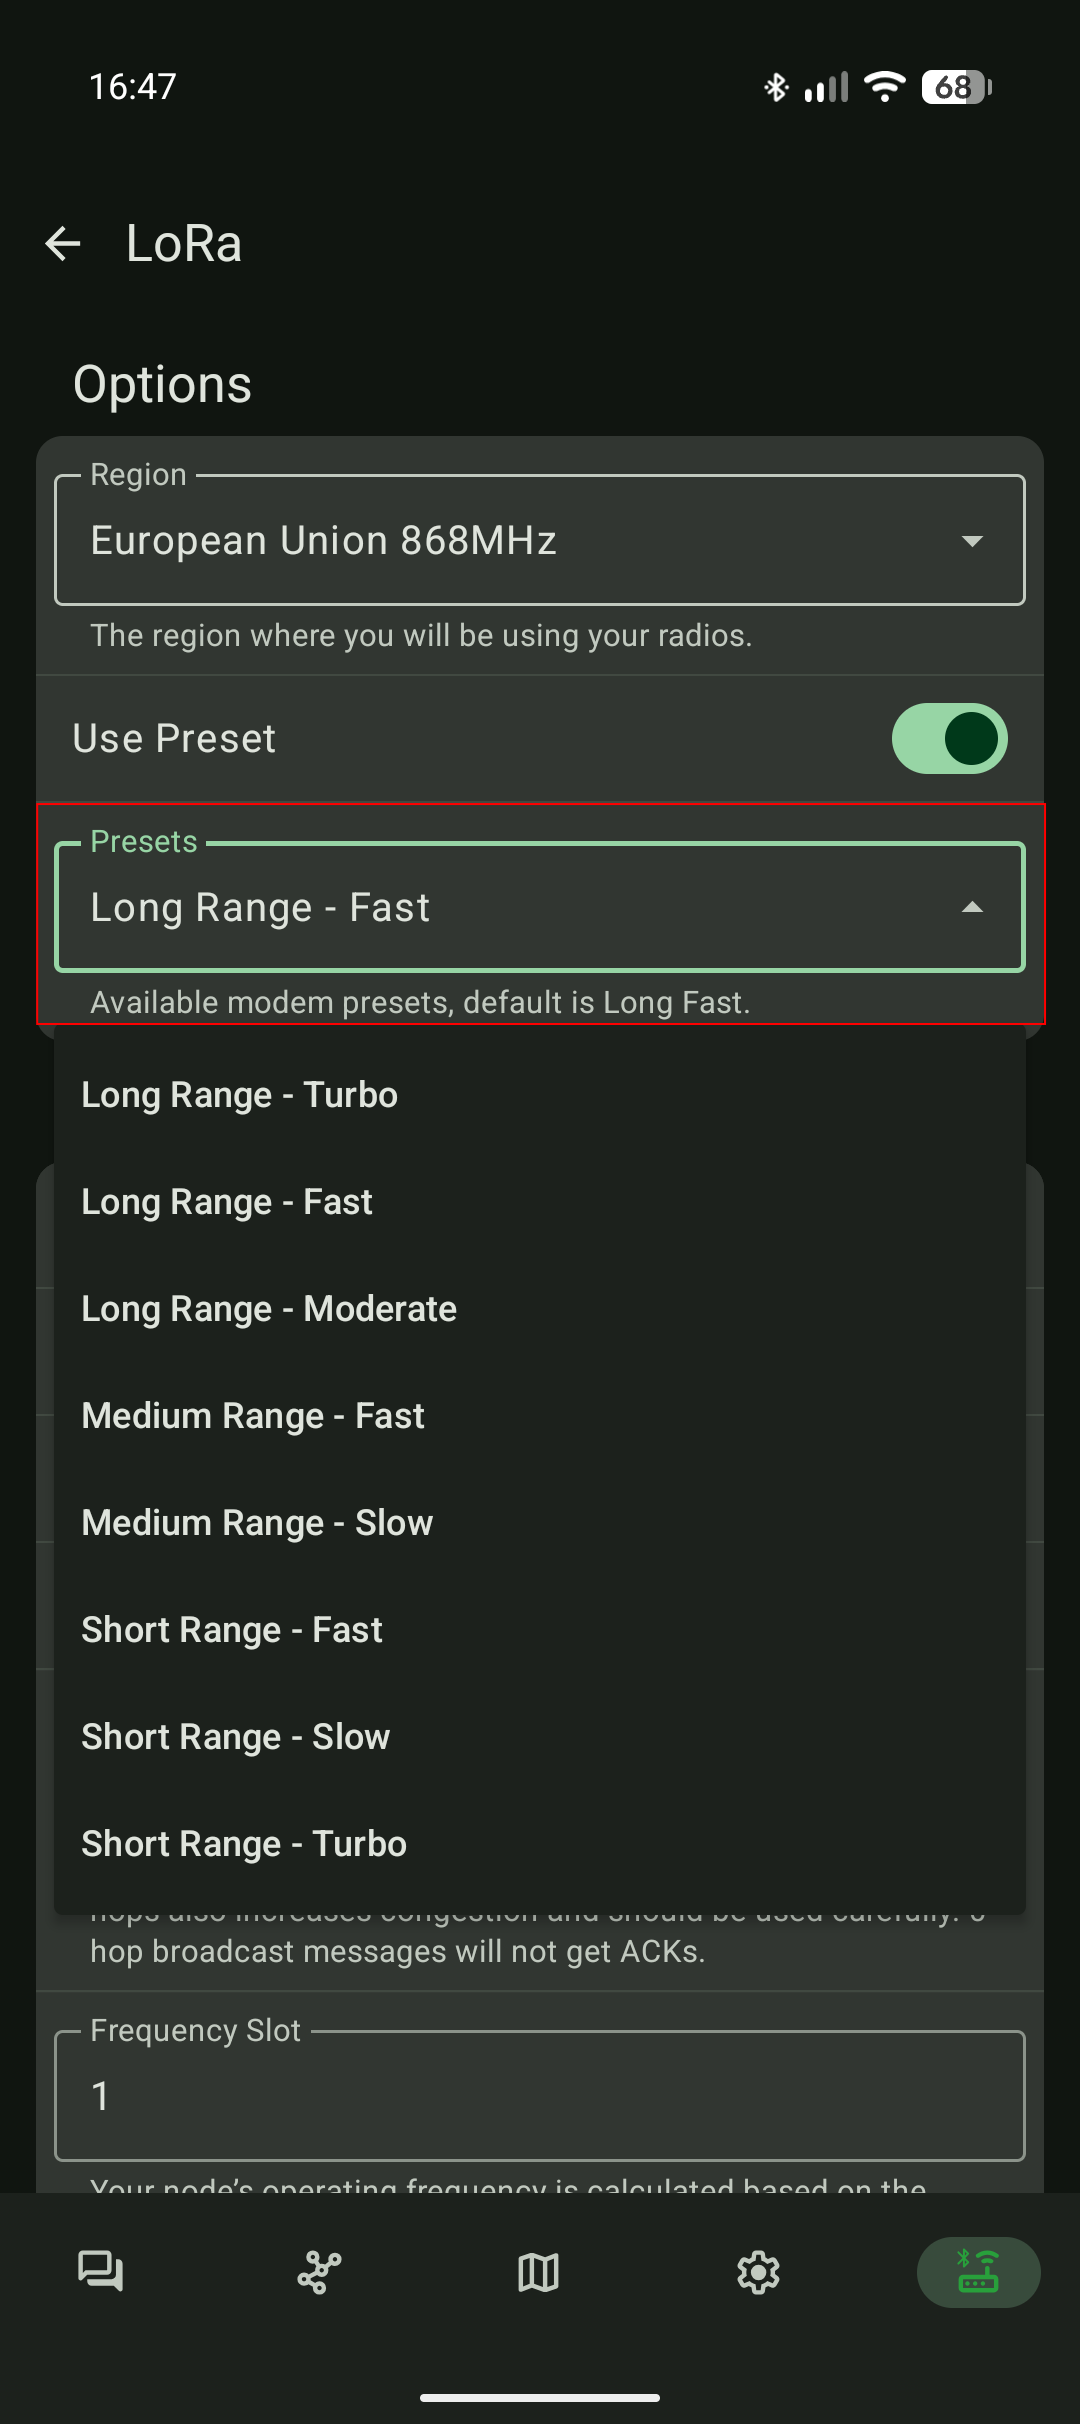
- Select the radio preset that you want to use and click on "Save" at the very bottom of the page. More details about radio presets here: meshtastic.org/docs/configuration/radio/lora
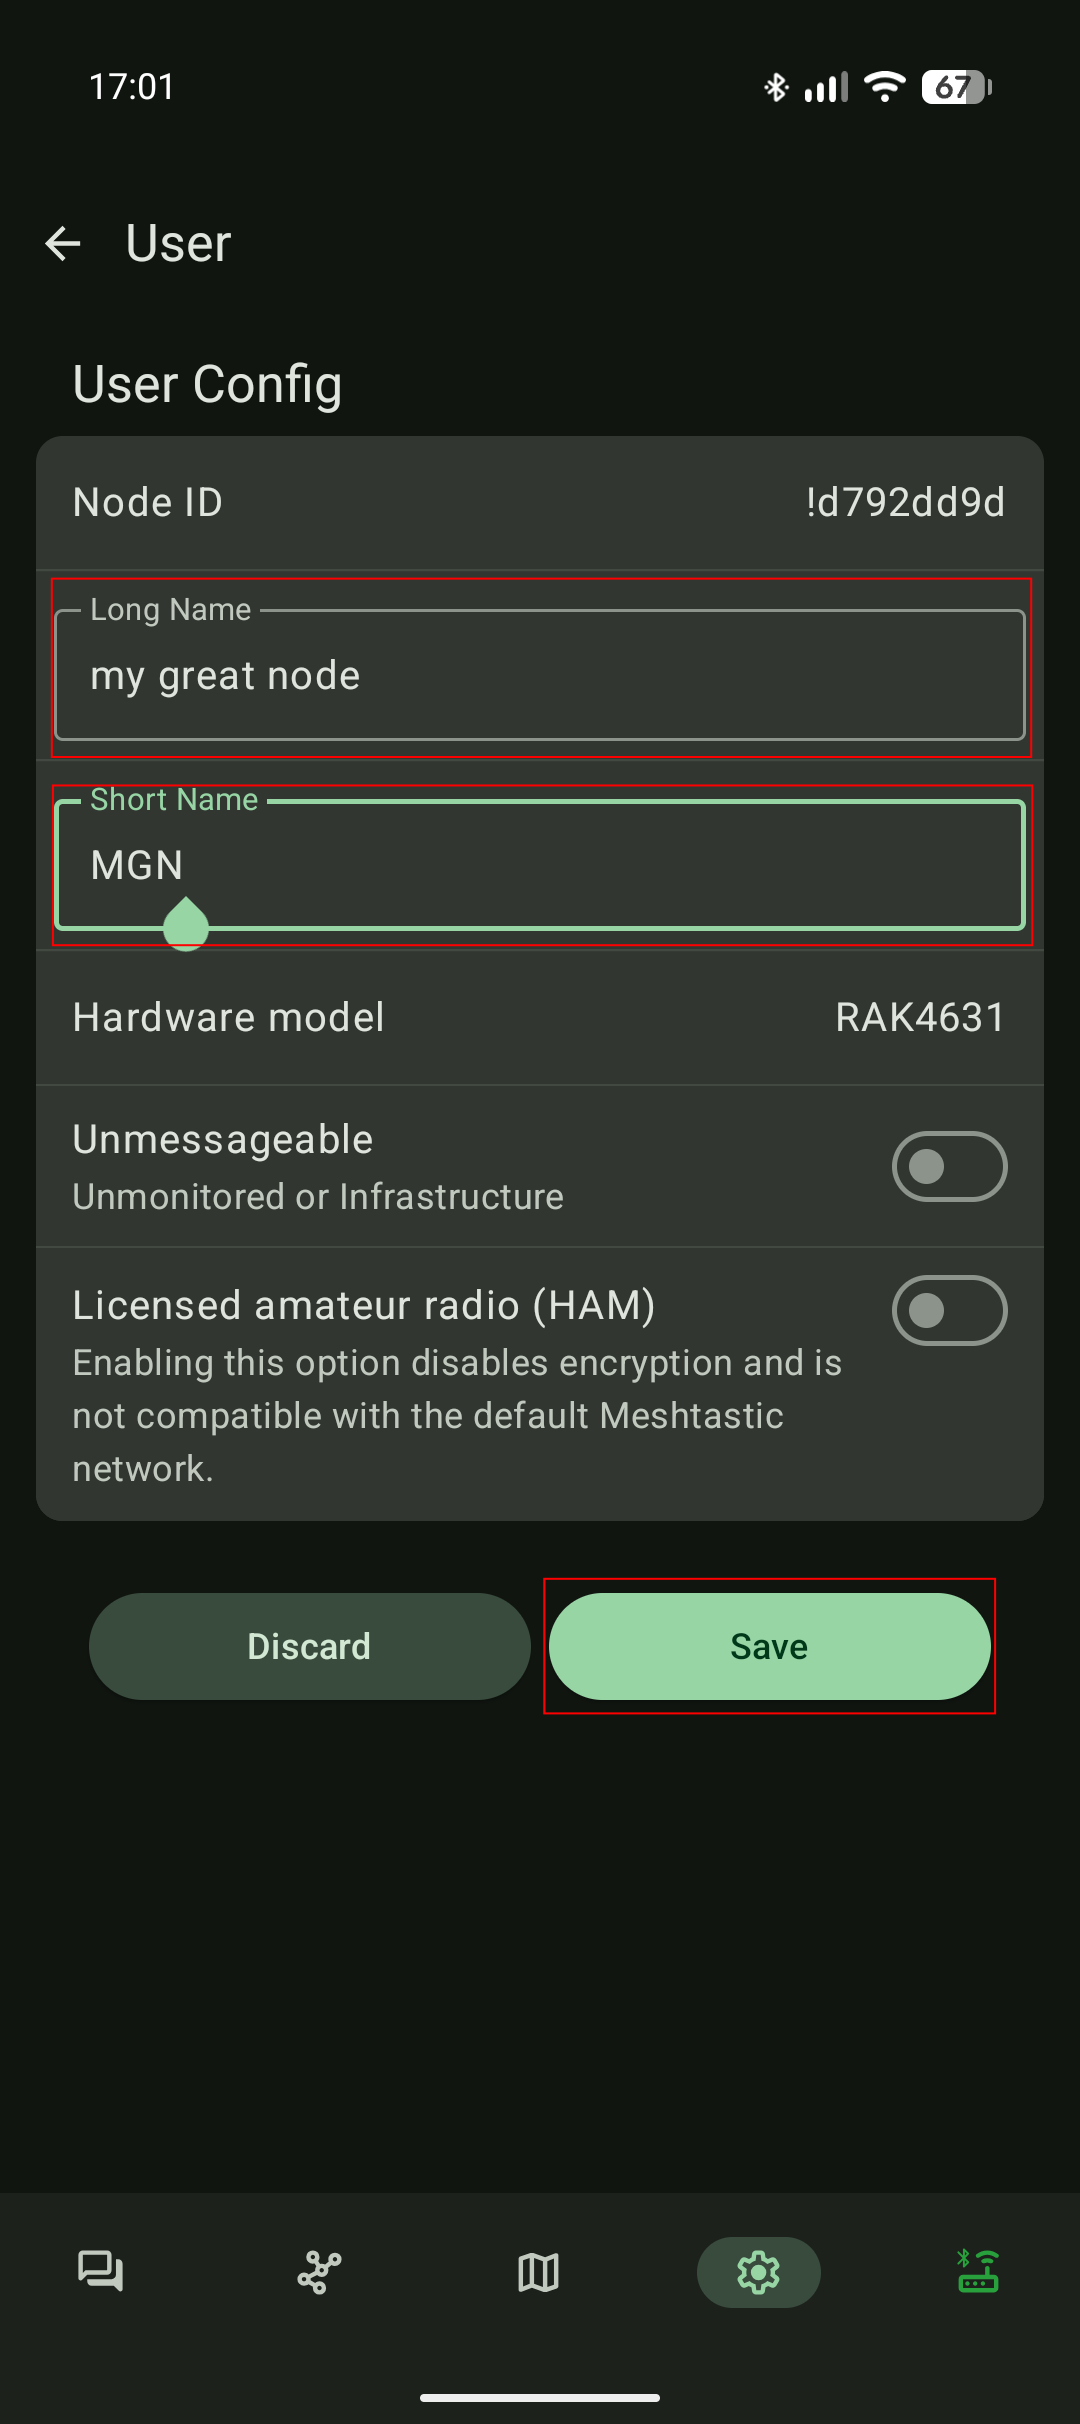
- Under "Device configuration > User" set the short and long name of your node. Those names are displayed to other Meshtastic users and is used as an identifier.
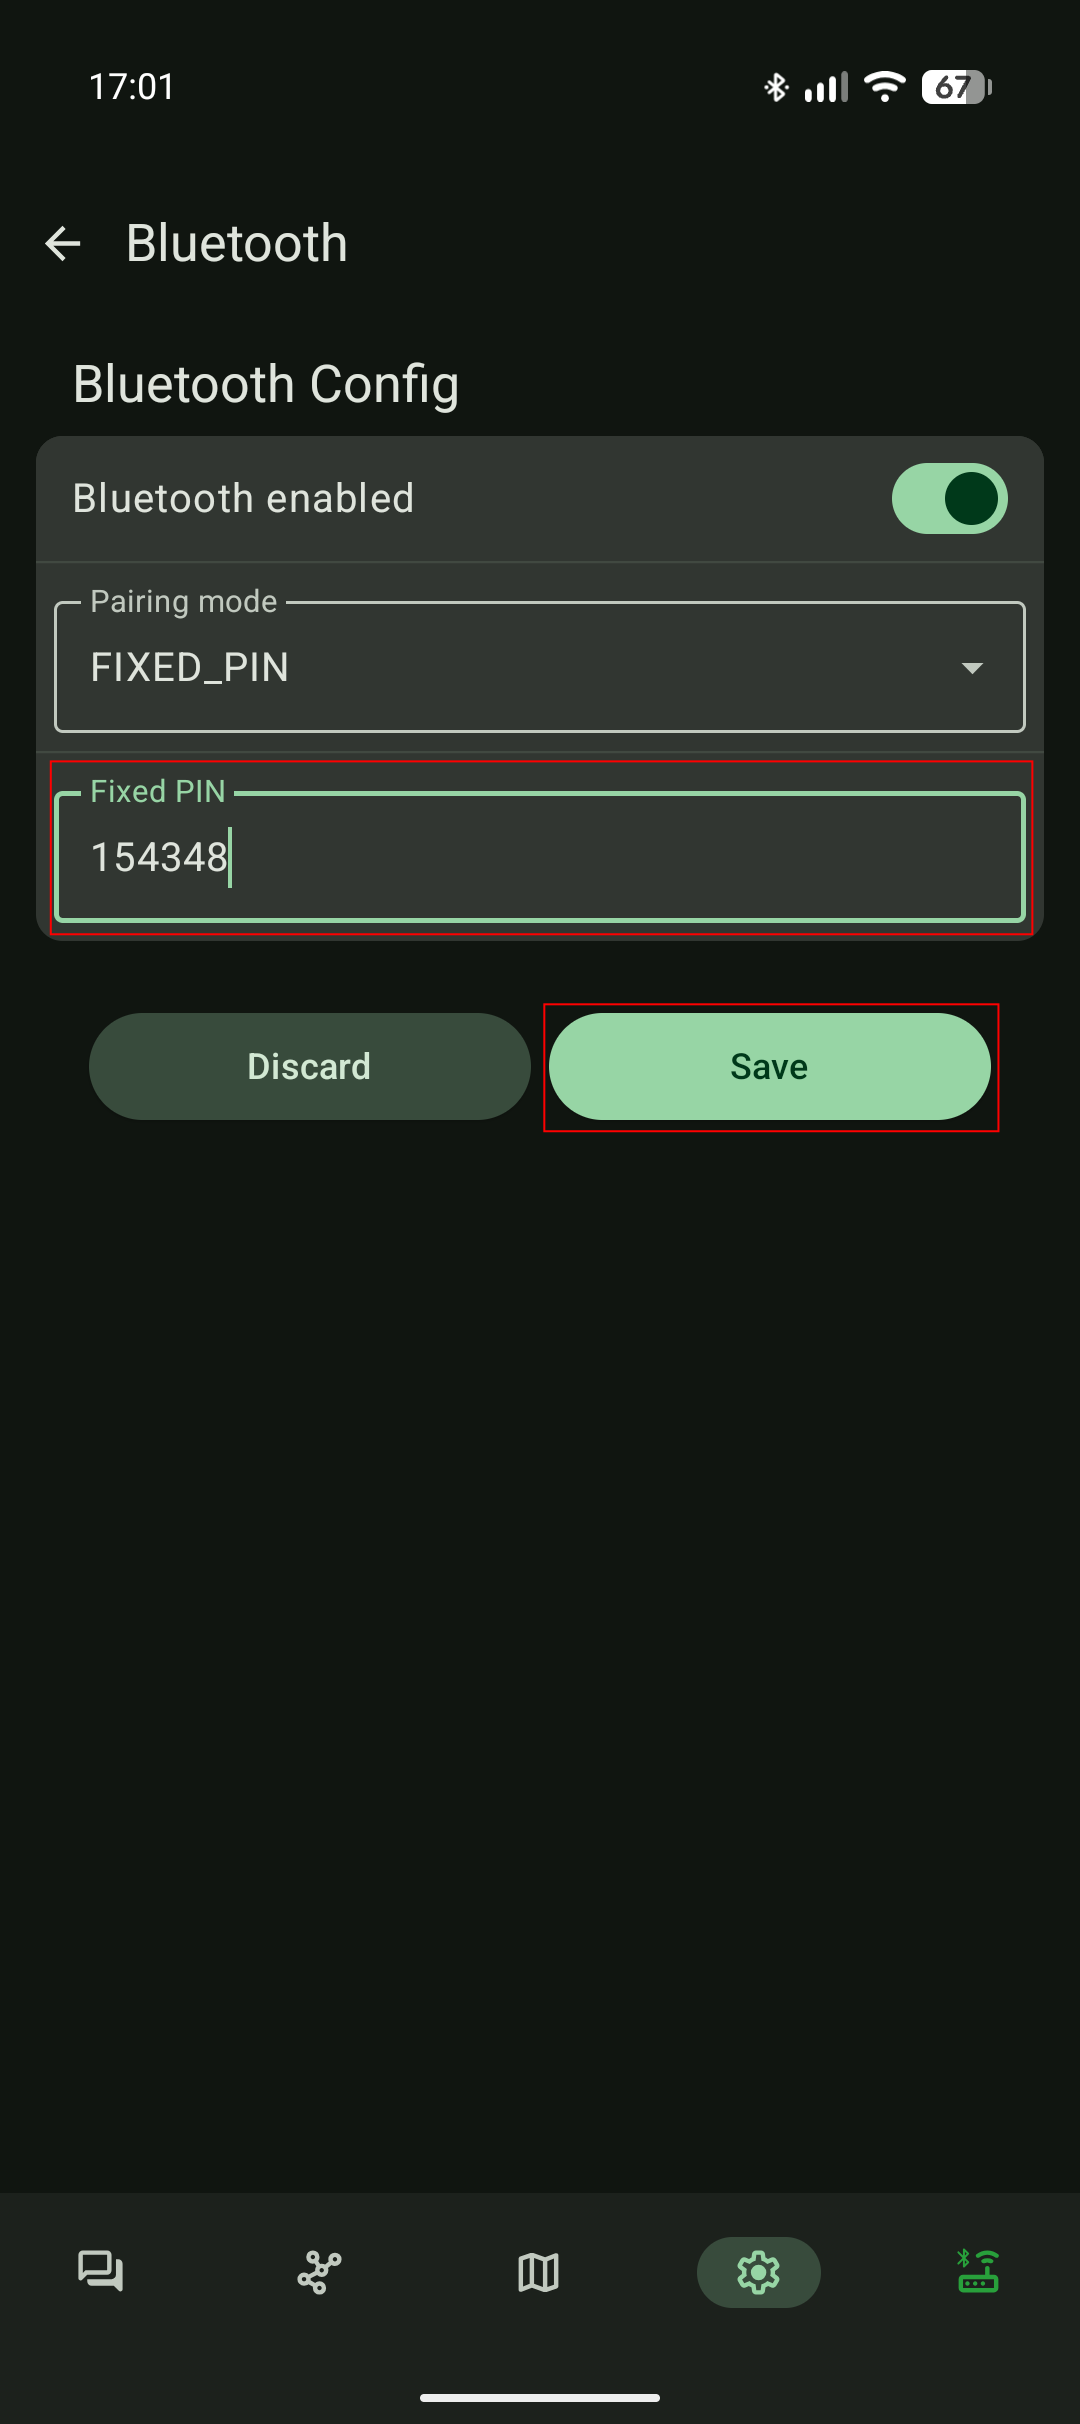
- Finally under "Device configuration > Bluetooth" set a custom Bluetooth PIN for your Meteor.
Default Bluetooth password: 123456
3.  4.
4. 5.
5.
6.  7.
7. 8.
8.
Shutdown your Meteor Pro
To power off your Meteor Pro hold the "Power Button" for 5 seconds and release it. Wait 5 seconds and the Meteor Pro LED will turn off indicating that the radio is now "OFF".
Autonomous mode
As soon as your Meteor Pro has been initialised (see #First boot initial setup) the radio is now autonomous.
An autonomous Meteor Pro:
- Participate in extending the mesh network. Your Meteor will relay others transmission by itself.
- Will blink its LED in a rainbow color pathern when a mesh message was addressed to your Meteor.
- If you enabled the location sharing feature, the Meteor Pro will share its geolocation with members of the mesh network.
To interact actively with the mesh (sending text messages, reading messages, creating groups, etc...), you will need to connect to your Meteor Pro using one of the Meshtastic apps. You can find more information about the Meshtastic apps here: meshtastic.org/docs/software/.
Firmware update - Meshtastic
Overview
The Meteor Pro operates using the Meshtastic firmware.
By it's open source and very successful nature, the Meshtastic firmware evolves rapidly.
It is strongly recommended to follow firmware developments and keep your device updated with the latest stable release to ensure optimal performance and compatibility.
Patch notes and firmware release details are available here: https://github.com/meshtastic/firmware/releases/
Updating the firmware
Before starting, make sure that your Meteor Pro remains connected during the entire flashing process.
Interrupting the connection during an update may cause the device to enter an undefined or unrecoverable state.
Step-by-step procedure:
-
Connect your Meteor Pro to your computer using the supplied USB-C cable.
-
Open a browser that supports Web Serial (such as Chrome, Edge, or Opera).
-
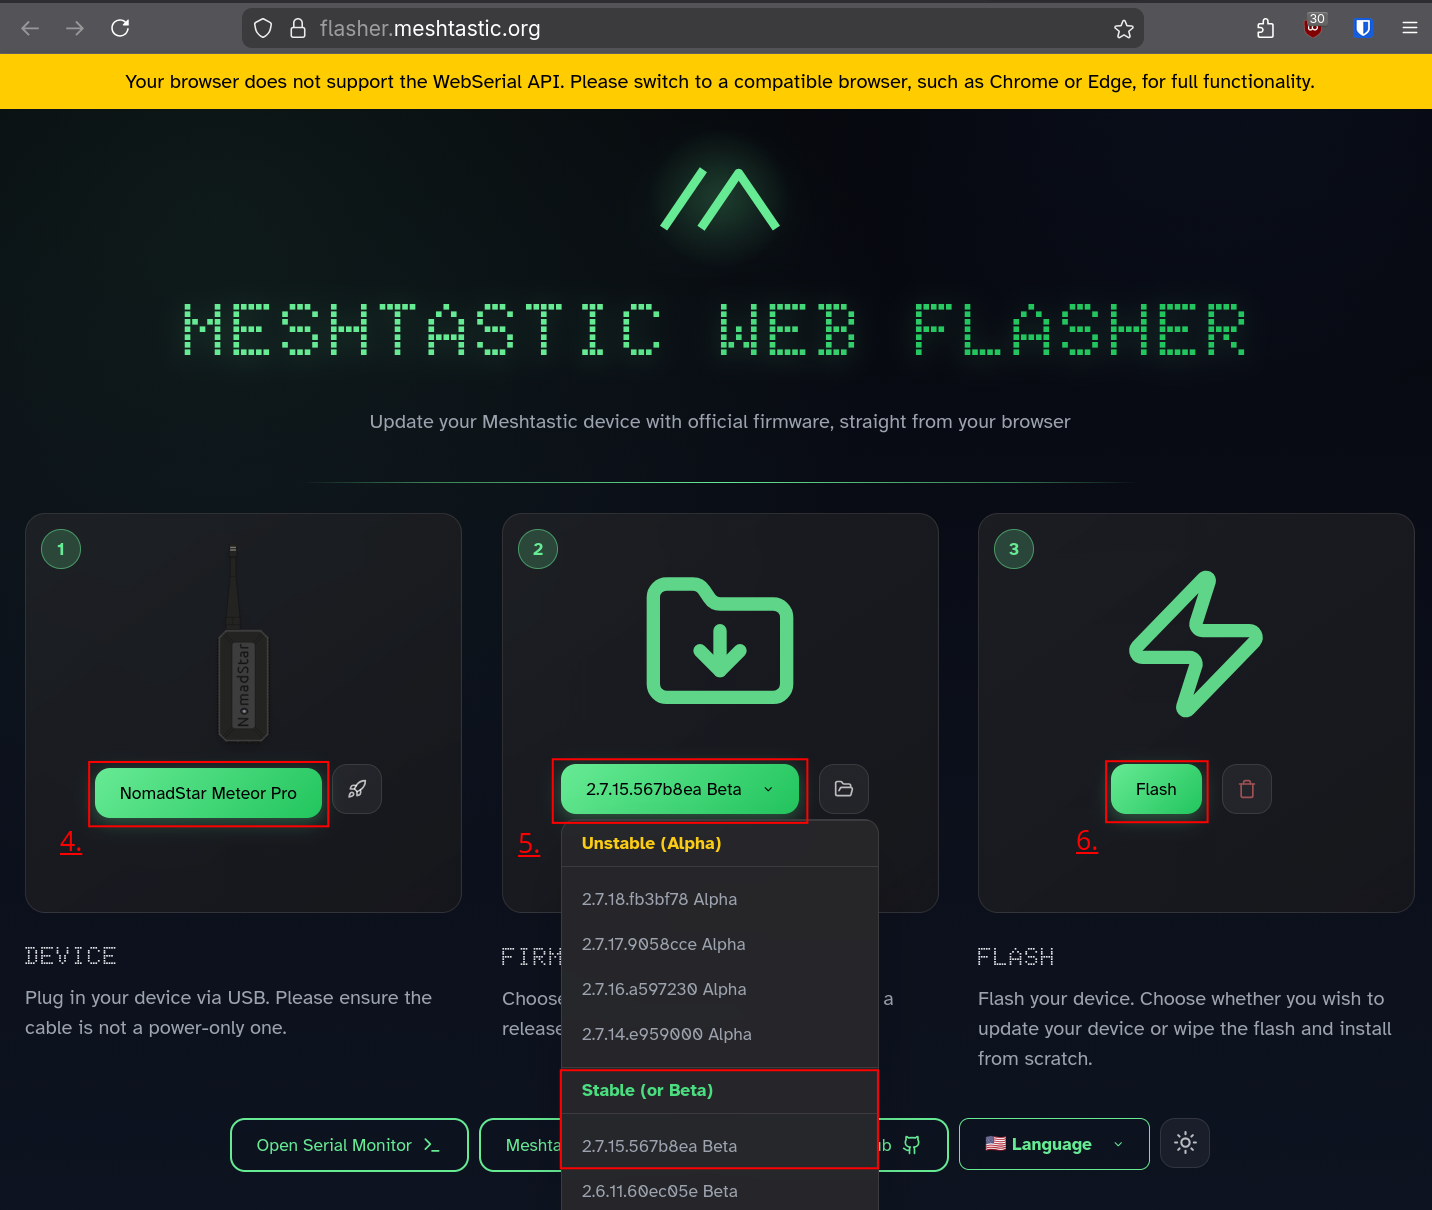
Go to the official Meshtastic Flasher website: https://flasher.meshtastic.org
-
In the device list, select NomadStar Meteor Pro.
-
Choose the latest stable (Beta) firmware version available.
-
Click “Flash”.
- On the next page, click on "Enter DFU".
- A USB storage device named "RAK4631" should appear in our filesystem explorer on your computer.
- Back to the flasher, click on "Download UF2".
- Copy the UF2 file downloaded on step 9. and copy it on the USB storage "RAK4631".
- Wait for the USB "RAK4631" storage media to disconnect by itself.
-
Once the USB storage "RAK4631" disappeared, you can safely disconnect the Meteor Pro from your computer.
Important notes
-
Do not disconnect the USB cable or close the browser during flashing.
-
Ensure your computer remains powered and does not enter sleep mode.
-
Only use official Meshtastic firmware or firmware verified by Nomadstar SARL.
-
In case of failed updates or unusual behavior, contact Nomadstar support for assistance.
Datasheet
| Battery | Li-ion NCR-18650BF 3.6V 3350mAh |
| Electrical specifications | Input power: 5 V DC, max 1 A (via USB-C) |
| Power consumption | Typical power consumption: ~1W during operation |
| Dimensions | 110mm x 51mm x 47mm |
| Weight | 250g |
| Connector | USB-C (data and charge) |
| Operational / Storage humidity | 0% to 100% (non-condensing) |
| Operational and Storage temperatures | -20°C to +60°C |
| LoRa radio frequencies | IN865, EU868, US915, AU915, KR920, AS923, RU864 |
| Output radio power | 0.25W |
| Short range wireless connectivity | BLE 5.0 |
| GNSS | GPS, GLONASS, Galileo, BDS, QZSS |
| Encryption | AES256 |
| Range | 50Km with line of sight (and even more) |
| Operating system | Meshtastic firmware |
| Certifications |
CE / RoHS / RED / WEEE |
| Ingress protection | IP66 |
| Origin | Swiss made |
Maintenance and service
Cleaning
-
Always disconnect the Meteor Pro from power before cleaning.
-
Use a soft, dry cloth or, if necessary, a slightly damp cloth with clean water.
-
Do not use solvents, alcohol, or abrasive cleaners — they may damage the enclosure or seals.
-
Ensure that no moisture enters the USB-C connector, antenna port.
Regular inspection
To maintain reliability and safety, perform periodic checks:
-
Inspect the USB-C connector for corrosion or wear.
-
Verify that the antenna connector is tight and undamaged.
-
Check the enclosure seals and gaskets for signs of deterioration (especially after outdoor use).
-
Confirm that the indicator LED and communication functions operate as expected.
Battery maintenance
-
The internal battery is a Li-ion NCR-18650BF 3.6 V / 3350 mAh cell.
-
Battery replacement should only be carried out by Nomadstar SARL or authorized personnel to maintain water-resistance and compliance.
-
Do not puncture, disassemble, short-circuit, or expose the battery to fire or high temperatures.
-
If the device shows signs of swelling, heat, or leakage, discontinue use immediately and contact support.
Service and repairs
Do not open or modify the Meteor Pro yourself.
Opening the enclosure voids the warranty and may compromise safety or compliance.
For repairs, calibration, or component replacement, contact:
Nomadstar SARL – Technical Support
Storage
-
Store the unit between –20 °C and +60 °C in a dry environment.
-
For long-term storage, charge the battery to 50 % and recharge it every 6 months to maintain performance.
Residual Risks
Despite all protective measures taken during design and manufacturing, some risks cannot be entirely eliminated:
| Type of risk | Description |
|---|---|
| Electrical | Risk of short-circuit or electric shock if the housing is opened or if moisture enters connectors. |
| Battery | Risk of fire, swelling or leakage if the internal Li-ion battery is punctured, shorted, overheated or replaced with a non-approved battery. |
| Mechanical | Damage may occur if the device is dropped, subjected to vibration or improperly mounted. |
Using the device outside of the specified conditions may increase these risks and void compliance and warranty.
Manufacturer & compliance information
Manufacturer
Nomadstar Sàrl
c/o Colab Sàrl
Chemin de la Fonderie 2
1700 Fribourg, Switzerland
https://nomadstar.ch
support@nomadstar.ch
Certifications and Compliance
The Meteor Pro complies with the following directives and standards:
-
CE – Conformity with EU directives
- IP66 - Degree of protection provided by enclosure (IEC 60529)
-
RoHS – Restriction of Hazardous Substances (Directive 2011/65/EU)
-
RED – Radio Equipment Directive (2014/53/EU)
-
IEC 62368-1 – Audio/Video, information and communication technology equipment – Safety requirements
The device meets the essential requirements and other relevant provisions of the RED Directive 2014/53/EU.
A Declaration of Conformity (DoC) is available upon request.
Labels and Symbols
The following marks are present on the product label:
| Symbol | Meaning |
|---|---|
 |
Conformity with EU directives
2014/53/EU RED Directive 2011/65/EU RoHS Directive
EN IEC 62368-1:2020 |
 |
Waste Electrical and Electronic Equipment Directive 2012/19/EU
Directive DEEE 2012/19/UE |
All symbols comply with IEC 60417 and ISO 7000 graphical symbol standards.
Do not attempt to open, modify, or repair the Meteor Pro yourself.
For service, maintenance, or disposal, contact Nomadstar SARL or an authorized partner.
The Meteor Pro is designed for field communication and geolocation.
Any use outside the scope defined by Nomadstar SARL — such as modification of internal components, or use with unexpected accessories — may void compliance and warranty.
End of life and recycling
Environmental responsibility
Nomadstar SA is committed to minimizing the environmental impact of its products throughout their lifecycle.
At the end of its service life, the Meteor Pro must not be disposed of as household waste.
WEEE directive
This product is marked with the symbol of a crossed-out wheeled bin in accordance with the European Directive 2012/19/EU (WEEE).
This indicates that electrical and electronic equipment must be collected and recycled separately.
Dispose of the device at an authorized collection point for electronic waste or return it to Nomadstar SARL for proper recycling.
Battery disposal
The internal Li-ion battery contains valuable and potentially hazardous materials.
-
Do not incinerate, crush, or open the battery.
-
Do not dispose of batteries in household waste.
-
Hand them over to designated collection facilities or return them with the device to Nomadstar SARL.
Battery specification reminder:
Type: Li-ion 18650 NCR18650BF
Voltage: 3.6 V Capacity: 3350 mAh
Disassembly and recycling
Disassembly should only be performed by qualified personnel.
It involves removal of the enclosure screws, detachment of the PCB, and safe extraction of the battery.
Recycling should follow the applicable local regulations for electronic assemblies, aluminum housings, and lithium-based cells.
Disposal declaration
Improper disposal of this product or its battery may cause environmental harm or violate local regulations.
Please follow local recycling programs or contact Nomadstar SA for assistance with responsible disposal.